
Enable Channels
Enable Channels
WinDaq must be in the SET-UP operating mode. Channels cannot be added, deleted, or configured once the user has entered the RECORD mode.
![]() Click
on the Enable button in the Toolbox.
Click
on the Enable button in the Toolbox.
![]() In
the Edit menu click on Channels...
or double-click on the Channels:
field
in the status bar. This displays the Channel Selection grid.
In
the Edit menu click on Channels...
or double-click on the Channels:
field
in the status bar. This displays the Channel Selection grid.

The current enabled status of all connected device channels is displayed in this grid. The Channel Selection grid allows the user to enable and disable all input channels. All channels are enabled/disabled with a left-click on the channel box. Analog Input channels show a checkmark when enabled. The general-purpose digital channel (channel 9) displays an "I" when enabled. The Rate channel (channel 10) displays an "R" when enabled. The Count channel (channel 11) displays a "C" when enabled.
View Channels
![]() In
the View menu click on Format
Screen. In the Format Screen box, click on the desired display
format.
In
the View menu click on Format
Screen. In the Format Screen box, click on the desired display
format.
![]() Choose
View Format Screen (ALT, V, F). In the Format Screen box, select the desired
display format using ↑ or ↓ keystrokes. Press ENTER.
Choose
View Format Screen (ALT, V, F). In the Format Screen box, select the desired
display format using ↑ or ↓ keystrokes. Press ENTER.
It is possible to display a format design other than the standard display formats listed. For example, suppose you wanted to monitor three waveforms on the screen. Your best choice among the standard display formats capable of displaying at least three waveforms is the four waveform format. However, the fourth displayed waveform would be blank. It would simply occupy screen space without conveying any useful information. The tool used to devote the entire window to the exact number of waveforms you wish to monitor is called the User-specified format option. To use the User-specified format option:
![]() In
the View menu click on Format
Screen. In the Format Screen box, click on User-specified
format….
In
the View menu click on Format
Screen. In the Format Screen box, click on User-specified
format….
![]() Choose
View Format Screen (ALT, V, F). In the Format Screen box, select User-specified
format… using ↑ or ↓ keystrokes. Press ENTER.
Choose
View Format Screen (ALT, V, F). In the Format Screen box, select User-specified
format… using ↑ or ↓ keystrokes. Press ENTER.
This displays the Screen format dialog box.
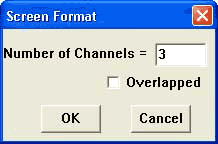
![]() Enter
the desired number of channels to be displayed (up to 16 overlapped),
and click OK. You also have the option of overlapping
the specified number of waveforms. To overlap the waveforms, click the
Overlapped check box. An X appears in the box indicating an overlapped
format. A subsequent click removes the X, indicating a non-overlapped
format.
Enter
the desired number of channels to be displayed (up to 16 overlapped),
and click OK. You also have the option of overlapping
the specified number of waveforms. To overlap the waveforms, click the
Overlapped check box. An X appears in the box indicating an overlapped
format. A subsequent click removes the X, indicating a non-overlapped
format.
![]() Enter
the desired number of channels to be displayed (up to 16 overlapped),
and press ENTER. You also have the option of overlapping the specified
number of waveforms. To overlap the waveforms, press the TAB key until
a dotted box appears around Overlapped, then press the space bar. An X
appears in the Overlapped check box indicating an overlapped format. A
second press of the space bar removes the X, indicating a non-overlapped
format.
Enter
the desired number of channels to be displayed (up to 16 overlapped),
and press ENTER. You also have the option of overlapping the specified
number of waveforms. To overlap the waveforms, press the TAB key until
a dotted box appears around Overlapped, then press the space bar. An X
appears in the Overlapped check box indicating an overlapped format. A
second press of the space bar removes the X, indicating a non-overlapped
format.