![]() Click
the Sample Rate button in the Toolbox.
Click
the Sample Rate button in the Toolbox.
![]() In
the Edit menu click on Sample
Rate….
In
the Edit menu click on Sample
Rate….
OR
Double-click on the S/s (F3): field in the status bar.
![]() Choose
Edit Sample Rate… (ALT, E, R).
Choose
Edit Sample Rate… (ALT, E, R).
OR
Press F3.
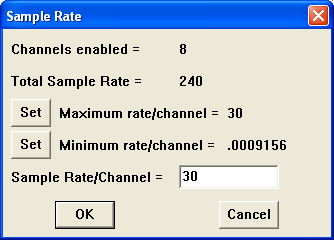
The sample rate dialog box opens.
Setting Sample Rate for DI-149 Instruments

Enter the desired sample rate per channel in samples per second in the Sample Rate/Channel text box. Click on a Set button to have WinDaq automatically set your per channel sample rate to the maximum or minimum allowed for your throughput rate. Please Note: WinDaq/Lite will display a total sample throughput rate of 10,000 Hz (or 1250 Hz per channel) but will not record at rates over 240 Hz throughput (30 Hz per channel). You must purchase WinDaq/HS to record at rates over 240 Hz throughput.
Click OK or press the ENTER key.
The sample rate per channel is displayed in the lower left corner of the window as S/s/CHAN: (samples per second per channel).

Minimum and maximum values for sample rate vary by instrument see your hardware manual for details.
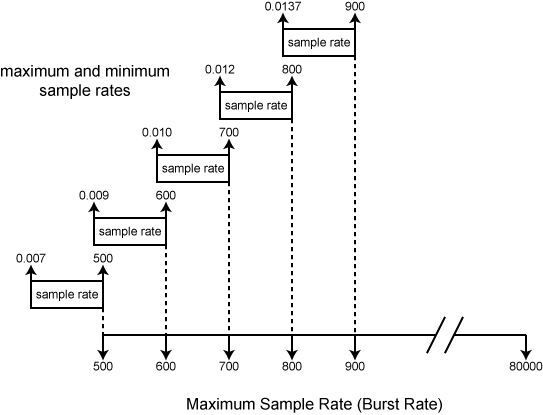
In order to enter a sample rate of less than 1 in the Sample Rate text box (effectively sampling about once per minute) you may also be required to lower the maximum sample rate (burst rate). See Preferences > Maximum Sample Rate.
The following diagram illustrates the relationship of maximum sample rate (burst rate) to sample rate.

As can be seen from the illustration, the maximum burst rate must be set to the low end of its range to get a sample rate less than 1. The maximum burst rate can be restored to its previous value if desired.
The Input Buffer Size in KB value is displayed for informational purposes only in this text box, it can not be directly adjusted by the user. It indicates the size of the input buffer, which is where the acquired data will be temporarily stored (in “valuable” or scarce, contiguous Global DOS memory). The amount of memory allocated for this buffer is a function of three factors: the current sample rate, how much memory is currently being used by your computer, and the input buffer size limit (maximum amount of your computer’s memory you have dedicated to this buffer, specified from the Preferences command on the Edit menu - see Buffer Size). The Disk Buffer Size in KB value is also displayed for informational purposes only and can not be directly adjusted by the user. It indicates the size of the disk buffer, which is a temporary storage place (in “cheap” or easily-attainable, non-contiguous memory) for the acquired data before being written to disk.
When the desired sample throughput rate is entered, click the OK button or press the Enter key to close the dialog box.