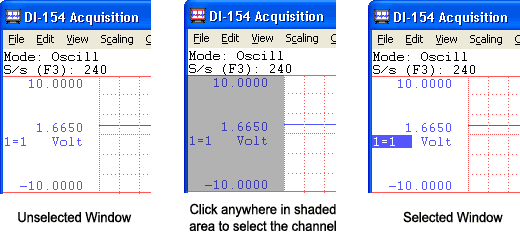
Note: some products do not support software selectable Gain settings. See Gain Factors and Full Scale Range for a list of Gain Factors for all hardware products that support Gain.
Choose a gain factor (varies by instrument) to get the best possible measurement resolution for your signals. The default WinDaq Acquisition gain configuration is 1 (unity). A gain of 1 provides the widest measurement range possible on any given instrument. For example, if using a DI-720 - this instrument features a maximum analog measurement range of ±10 volts and programmable gain factors of 1, 2, 4, and 8. At a gain of 1 (gain factor = 1), the full scale measurement range is ±10 volts. However, if gain is set to 2, the full scale measurement range becomes ±5 volts. The full scale measurement range gets even smaller for gain factors of 4 (range = ±2.5 volts) and 8 (range = ±1.25 volts).

If the signals you plan to record need the wide measurement range that a gain of 1 provides, then skip this step. Otherwise, continue with this step to select a higher gain factor (thus narrower measurement range) for the best possible measurement resolution.


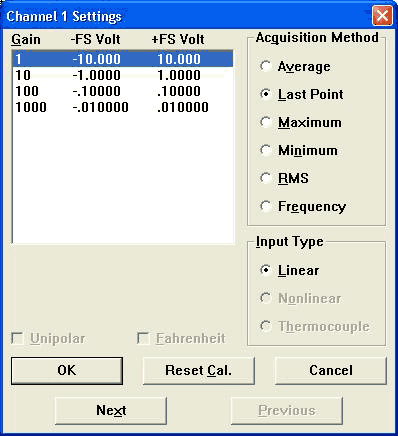
The gain factors you see displayed at the top of this dialog box are hardware dependent. Displayed next to each gain are the equivalent plus and minus full scale voltages that result from selecting that gain factor. These voltages vary by hardware device.
As the gain factor for a channel is sequenced upward and downward through gain ranges, ±full scale annotation adjusts to reflect the application of the various gain factors. A channel's gain factor cannot be adjusted following the initiation of data storage to disk. Only the SET-UP operating mode allows gain factor adjustments.
Channel Settings Dialog Box
See Channel Settings for complete details regarding channel settings.
Unipolar/Bipolar Measurement Range
You can specify whether the signal you will be acquiring is unipolar or bipolar. A unipolar signal is one that ranges from 0 to + full scale (never goes below zero), and a bipolar signal is one that ranges from some negative value to some positive value (is both positive and negative going). If your signal is only a positive going waveform or a negative going waveform, always select the Unipolar check box. If your signal is both positive and negative going, leave the Unipolar box unchecked, thus specifying bipolar.
Whenever the gain or unipolar/bipolar setting is changed, any calibration is preserved and adjusted to reflect the new gain or unipolar/bipolar setting. Selecting Reset Cal allows you to reset the selected channel from a significant engineering units calibration back to the default voltage (or temperature, if using thermocouples) calibration.
See the Acquisition Method for complete details on each acquisition method. This feature is disabled for all DI-1XX products.
Input Types
This feature is disabled for all DI-1XX products.
Allows a step-through to the next or previous enabled channel (in order), setting up each channel for gain, unipolar/ bipolar, sample rate, etc., without closing this dialog box.