|
|
|
|
Moving an Ethernet Device to a Static Network or Connecting it to your PC |
|
If your Ethernet device was originally installed on a DHCP Network you will have to change the setting inside the device to run it on a Static Network or to run it directly connected to your PC or laptop. This should be done BEFORE moving the device. If DATAQ Instruments Hardware Manager was not installed onto the new network or PC skip these instructions and follow the installation instructions (Add IP).
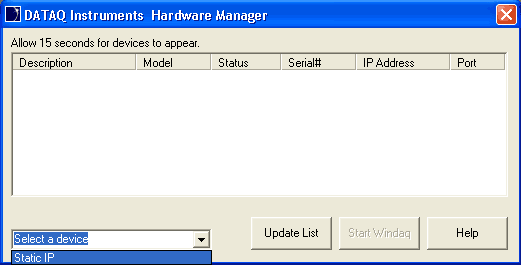
1. Highlight the device you would like to move to your PC or to a Static IP Network.
2. Click on the Static IP command in the drop-down list. If the Static IP command does not show up in the command list then this feature is unavailable for the selected instrument.

3. Select the device from the list. Confirm that the MAC address on the sticker located on the bottom of your device matches the MAC address shown in the list.
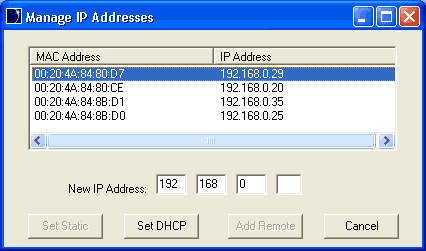
4. The software will automatically enter the first portion of the New IP address based on your Subnet mask. Enter a new IP address in the space provided (whichever boxes are able to be edited will appear blank and must be filled in). You may need to use the backspace key before entering the new number. If the number is already being used you will get an error message. It is safest to use an integer between 3 and 254. This IP address cannot be the same as the IP address of your network card.

5. The Device will disappear from the Main Window. Unplug the device and move it to its new location.

6. Plug the device into the Static IP Network or to your PC. If the IP address is not right you will receive the following error.

7. Left click in the white space and select the Static IP command.
8. The device will appear in the Manage IP Addresses list.
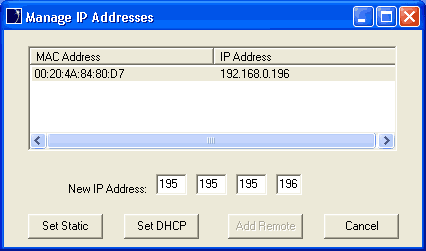
9. Select the device from the list. Confirm that the MAC address on the sticker located on the bottom of your device matches the MAC address shown in the list. The software will automatically enter the first portion of the New IP address based on your Subnet mask. Enter a new IP address in the space provided (whichever boxes are able to be edited will appear blank and must be filled in). You may need to use the backspace key before entering the new number. If the number is already being used you will get an error message. It is safest to use an integer between 3 and 254. This IP address cannot be the same as the IP address of your network card.
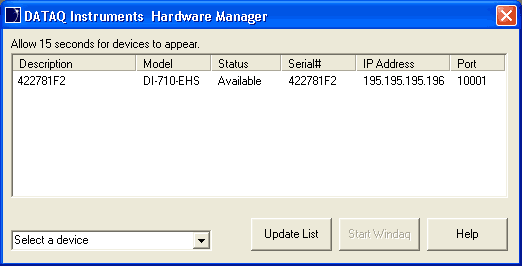
10. Click on the Set Static button. You will revert back to the Main Window. Click on the Update List button until the device appears in the list (could up to a minute for the settings to take effect).
To move the device back to a DHCP Network see Moving an Ethernet Device to a DHCP Network.
