|
|
|
|
Stand-alone Setup > Sample Rate |
|
Note: When recording at rates over 7,200 Hz, gaps in data are more likely to occur. Each gap in data causes the data file to close and start recording again in a new data file. When recording with Memory Configuration set to "circular," once the SD card is full, a gap will cause recording to immediately stop with an error (status LED will flash yellow). Use a recommended SD card (133x or faster) and/or lower the sample rate to decrease the chance of gaps in data.
The Instrument throughput rate may be set using the Change Sample Rate button. The current throughput rate and corresponding per channel sample rate are displayed in the Sample Rate Frame under the Change Sample Rate button.
To change the Sample Rate:
Note: When enabling/disabling channels the Per Channel Rate automatically adjusts based on the current Throughput Rate. To change the Per Channel Rate change the sample throughput rate. Enabling Remote Storage is the equivalent of adding another channel to the scan list and also affects the Per Channel Rate.
If the instrument is not able to achieve the desired throughput rate the configuration software will determine the closest rate possible and provide it as an alternative. Click OK to accept.
The actual throughput rate is determined using the following formula:
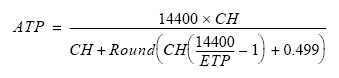
where:
ATP = actual throughput rate
CH = number of enabled channels
ETP = entered throughput rate
For example, if you enter 500 as the desired throughput rate (ETP=500) and you have 8 channels enabled (CH=8), your actual throughput rate would be 498.7013. The per channel sample rate can then be determined by dividing the actual throughput rate (ATP) with the number of channels enabled (CH) (i.e., 498.7013/8 = 62.33766 samples per second per channel).
Note: When recording at low sample rates be aware that the memory card must acquire 256 samples before it actually commits them to memory. For example, if you are recording one channel at 1 sample per second and power down occurs unexpectedly, you could lose up to 255 seconds (4.25 minutes) of data (255 samples). Use the following formula to determine the maximum amount of data loss at power failure.

