|
|
|
|
Stand-alone Setup |
|
Products: All DI-710, DI-715B, DI-718B, and DI-718Bx Stand-alone models.
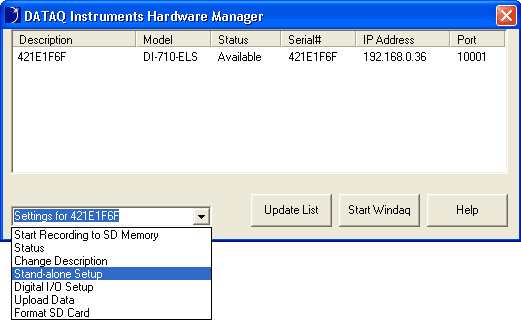
To access the Stand-alone Setup panel select a Stand-alone device. In the drop-down list select the Stand-alone Setup command. If the Stand-alone Setup command does not appear in the list then this feature is not available for the selected instrument.
All DI-710 and DI-715B stand-alone data loggers are configured for 16 analog single-ended inputs (each channel set to a Gain of 1 (10V), + Full Scale of 10 (the maximum full scale value), Baseline of 0, and Engineering Units of Volts), the throughput rate is set to 4800Hz (300 samples per second per channel), and the Digital I/O channel is disabled. The default configuration for DI-718B stand-alone data loggers is 8 channels enabled at 300 samples per second per channel with Remote Controls disabled.
The configuration settings can be changed in your data logger using this Set Up panel. To access the panel highlight the instrument you would like to configure and click on the Stand-alone Set Up button.
Click on the image to view the Demonstration Video
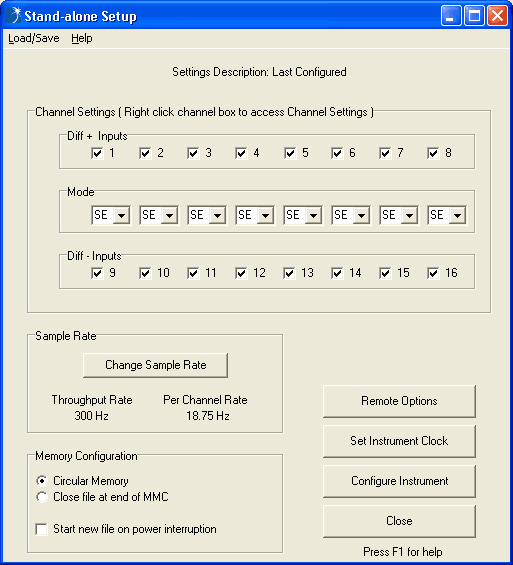
The Stand-alone Setup panel consists of:
The Load/Save Menu Item allows you to save multiple configuration settings for quick-load.
Help Menu Item
The Help menu Item provides access to these help files.
Settings Description
The Settings Description is the name given to the configuration settings saved in the Load/Save menu.
The Channel Settings Frame Allows you to set specific settings per channel. To access channel settings for each channel right-click the desired channel's channel box. The Mode drop-down box allows you to choose differential or single-ended input. Left-clicking the channel box will allow you to enable/disable a channel.
Allows you to set the sample throughput rate. Displays the instrument throughput rate and the per channel sample rate. Click the Change Sample Rate button to access the Sample Rate dialog box.
Choose the Memory Configuration for your data acquisition session using the radio buttons provided. Enable the checkbox if you would like the instrument to automatically begin recording a new file if power is interrupted. If the box is unchecked the instrument will go to Standby mode.
Remote Control Button
Click on this button to enable Remote Start/Stop and Remote Events.
Click on this button to synchronize the instrument clock to your PC.
Click on this button to write the configuration settings to your instrument.
Close Button
Closes the Stand-alone setup panel.
